


Details of the Glider
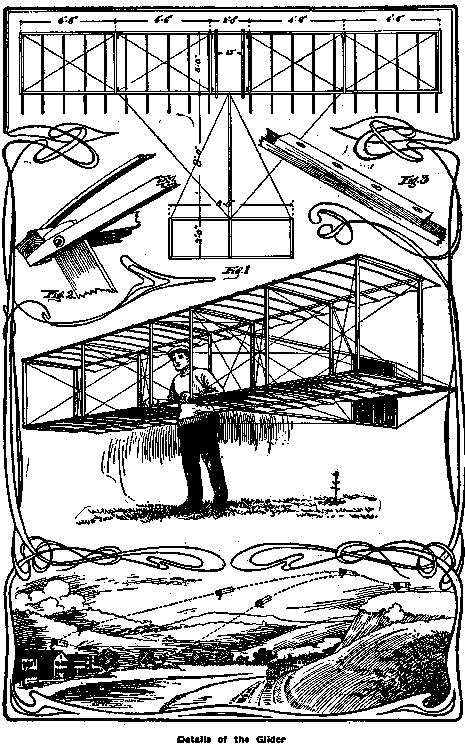
The 41 ribs may be nailed to the main frames on the upper side by using fine flat-headed brads 7/8 in. long. These ribs are spaced 1 ft. apart and extend 1 ft. beyond the rear edges of the main frames, as shown in Fig. 1. After nailing one end of a rib to the front long beam, the rib is arched by springing down the loose end and nailing to the rear beam. The ribs should have a curve as shown in Fig. 2, the amount of curvature being the same in all the ribs.
The frames of the main surfaces are now ready to be covered with cloth. Cambric or bleached muslin should be used for the covering, which is tacked to the front edge, stretched tightly over the bent ribs and fastened securely with tacks to the rear ends of the ribs. The cloth should also be glued to the ribs for safety. In the center of the lower plane surface there should be an opening 2 ft. wide and 4 ft. long for the body of the operator. Place the two main surfaces 4 ft. apart and connect with the 12 uprights, placed in the corner of each crosspiece and beam. The uprights are fastened by bolting to the crosspieces, as shown in Fig. 2. The whole structure is made strong and rigid by bracing with diagonal wires, both laterally and longitudinally. The vertical rudder is to keep the machine headed into the wind and is not movable. This rudder is made of cloth stretched over a light wooden frame, which is nailed to the rudder sticks connecting to the main frame. The horizontal rudder is also made of cloth stretched over a light wooden frame, and arranged to intersect the vertical rudder at its center. This rudder is held in position and strengthened by diagonal wires and guy wires. The horizontal rudder is also immovable and its function is to prevent the machine from diving, and also to keep it steady in its flight. The rudders are fastened to the glider by the two rudder sticks, and these sticks are held rigid by diagonal wire and also by guy wires leading to the sides of the main frames as shown in Fig. 1. The two arm sticks should be spaced about 13 in. apart and bolted to the long beams in the center of the opening in the lower plane where the operator is to take his position.
The glider should be examined to see that the frame is not warped or twisted. The surfaces must be true or the machine will be hard to balance when in flight. To make a glide, take the glider to the top of a hill, get in between the arm sticks and lift the machine up until the arm sticks are under the arms as shown run a few steps against the wind and leap from the ground. You will find that the machine has a surprising amount of lift, and if the weight of the body is in the right place you will go shooting down the hillside in free flight. The landing is made by pushing the weight of the body backwards. This will cause the glider to tip up in front, slacken speed and settle. The operator can then land safely and gently on his feet. Of course, the beginner should learn by taking short jumps, gradually increasing the distance as he gains skill and experience in balancing and landing.
The proper position of the body is slightly ahead of the center of the planes, but this must be found by experience. The machine should not be used in winds blowing faster than 15 miles an hour. Glides are always made against the wind, and the balancing is done by moving the legs. The higher the starting point the farther one may fly. Great care should be exercised in making landings; otherwise the operator might suffer a sprained ankle or perhaps a broken limb. The illustration shows two lines of flight from a hilltop, the glider travels on the upper line caused by the body of the operator taking a position a little back of the proper place, and on the lower line he changes his position from front to back while flying, which causes the dip in the line.
The Boy Mechanic Vol. 1 700 Things for Boys to Do
Publisher Popular Mechanics Co.
Copyright 1913, By H. H. Windsor
Borrowed from Chestofbooks.com