


The Use of Lock Wire – A Guide
For general purpose lock wiring, use the preferred sizes in Table 1-1. Use smaller diameter wire where parts are too small to permit a hole diameter to accommodate the preferred sizes, or where space limitations preclude the use of the preferred sizes. The larger sizes are used where stronger wire is required. Wire diameter of .032 is the most commonly used.
The common method of installing lock wire shall consist of two strands of wire twisted together (so called “Double Twist” method). (One twist is defined as being produced by twisting the wires through an arc of 180 degrees and is equivalent to half of a complete turn.) The single strand method of lock wiring may be used for some applications, such as in a closely spaced, closed geometrical pattern (triangle, square, rectangle, circle, etc.) parts in electrical system.
Where multiple groups are locked by either the double twist or the single strand method, the maximum number in a series shall be determined by the number of units that can be lock wired by a twenty-four inch length of wire.
Wire shall be pulled taut while being twisted. The number of twists per inch as recorded in Table 1-1, represents general practice and is given as guidance information only.
Caution must be exercised during the twisting operation to keep the wire tight without overstressing. Abrasions caused by commercially available wire twisting pliers shall be acceptable but nicks, kinks, and other damage to the wire are not.
Lock wire shall not be installed in such a manner as to cause the wire to be subjected to chafing, fatigue through vibration, or additional tension other than the tension imposed on the wire to prevent loosening. In the event that no wire hole is provided, wiring should be to a convenient neighboring part in a manner so as not to interfere with the function of the parts. Hose and electrical coupling nuts shall be wired in the same manner as tube coupling nuts.
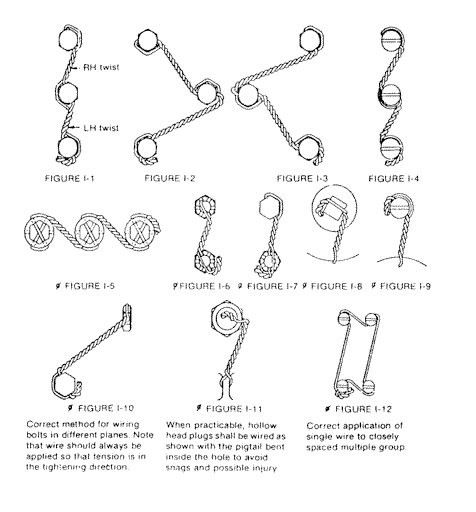
Various examples of lock wiring are shown in Figures 1-1 through 1-12. Figure 1-12 shows the single-stranded method, while the other figures show the two-stranded or double twist method.
In adjacent units, it is desirable that the holes be in approximately the same relationship to each other as shown in Figures 1-1 through 1-4 (for right-hand threads), thus the lock wire will have a tendency to pull the unit clockwise. This should be reversed for left-handed threads.
Where lock wire is used to secure a castellated nut on a threaded item, selection of locking hole diameter for the item shall be based on cotter pin requirements.
Lockwire and Lockwire Hold Data
| Wire Diameter | Twists per Inch | Recommended Hole Diameter |
| 0.020 | 9-12 | 0.037-0.057 |
| 0.025 | 9-12 | 0.060-0.080 |
| 0.032 | 7-10 | 0.060-0.080 |
* The information above is adapted from a motorcycle roadracing site, and may not be completely accurate when applied to aircraft.